Thursday 22 May 2014
How to cook Coconut Rice
How to make Nigerian Salad
igerian Salad is so unique that there is no other
place that prepares such filling and exotic salad as
this recipe. It can be had as a meal on its own or
as a side dish to the various Nigerian Rice
Recipes.
How to Make Nigerian Salad [Video]
The quantities of ingredients stated are what will
give you a typical taste of the Nigerian Salad. The
quantities can be halved or multiplied and the
same taste will be achieved.
Ingredients
1 medium bunch of Lettuce
5 medium sized Carrots
4 small pcs of Irish Potatoes
2 medium pcs of Cucumber
3 medium Eggs
1 415g tin of Baked Beans in tomato sauce
200g of Sweet Corn
5 pcs of Plum Tomatoes (Jos Tomatoes)
Salad Dressing – the classic Heinz Salad Cream
works best with the Nigerian Salad recipe. A close
substitute is the Heinz Caesar Salad Cream. You
can use mayonnaise too.
Before you prepare the Nigerian Salad
Wash and cook the Irish Potatoes till done. The
eggs should be hard boiled. To save time, these
two can be cooked in the same pot as they need
almost equal amount of time to get done.
All the vegetables need to be washed.
1. Cut the lettuce into thin shreds.
2. Scrape and shred the carrots using a grater.
3. Peel and cut the boiled potatoes into sizeable
cubes.
4. Peel, remove the seeds and cut the cucumber as
shown. If you want more green color in your salad,
you may peel the cucumber in stripes.
5. Remove the seeds from the plum tomatoes and cut
into small pieces.
6. Place all the cut vegetables in separate containers.
Open the sweet corn and drain the preservation
water. Rinse the seeds and set aside. Also open
the baked beans tin and set aside.
Remove the shells of the hard boiled eggs, slice
thinly and set aside. An egg slicer is perfect for
this job.
Preparation
1. With the exception of the egg, start putting the
ingredients in small batches into a big salad bowl
till all are exhausted.
2. Now, place the sliced eggs on the salad, covering
the top.
3. Cover the bowl and place in the fridge for at least
one hour. This is to allow all the ingredients to mix
well.
4. Serve with a salad dressing of your choice but the
Heinz Salad Cream works best with this recipe,
seconded by a caeser salad dressing.
Notes and Tips
If you prefer your Nigerian Salad crunchy,
substitute the lettuce with cabbage. You can also
use the two as the lettuce adds a green color to
the salad.
The above are the minimum ingredients for making
a Nigerian salad. More ingredients such as boiled
macaroni, corned beef, green bell pepper, green
peas etc can be added for varied flavour.
The Nigerian Salad is best consumed within 24
hours of preparation if no salad dressing is added
to it.
If you are lucky to buy a baby cucumber, it may
not be necessary to remove the seeds.
Nigerian Salad can be eaten alone or as a side
dish to Jollof Rice , Coconut Rice , Fried Rice and
other Nigerian rice dishes .
Valerie kadiri
Valerie kadiri
Valerie kadiri
Kadiri:How to make Coleslaw
oleslaw simply means cabbage salad. It is a blend
of finely shredded cabbage, carrots and a few other
crunchy vegetables. It is then generously dressed
with mayonnaise and salad cream.
It is generally eaten as a side dish to such foods
as Jollof Rice , Fried/Barbecued Chicken, Moi Moi
and many other rice dishes.
Coleslaw is usually served chilled to allow the
dressing settle into the vegetables.
Ingredients
1 small cabbage
1 small green bell pepper
½ tin of green peas
2 medium carrots
1 medium onion
5 tablespoons of salad cream (preferably Heinz
Classic Salad Cream)
4 tablespoons of mayonnaise
½ teaspoon sugar
A pinch of salt
Preparation
All the vegetables need to be washed.
1. Cut the cabbage, green bell pepper and onions into
very tiny pieces.
2. Scrape and shred the carrots using a grater, then
use a knife to cut across the shreds to make the
pieces even smaller.
3. Put the cabbage, green pepper, green peas, onions
and carrots into a large bowl and stir till you get a
good mix.
4. In a separate, smaller bowl, mix the salad cream,
mayonnaise, sugar and salt.
5. Pour the cream mix into the bowl of vegetables
and stir very well.
6. Chill and serve.
Note: If you prefer the coleslaw creamier, you can
increase the quantity of the salad cream. Feel free
to add a pinch of ground pepper if you like it spicy.
Coleslaw can be eaten alone or as a side dish to
Jollof Rice , Coconut Rice , Fried Rice and other
Nigerian rice dishes .
igerian Salad is so unique that there is no other
place that prepares such filling and exotic salad as
this recipe. It can be had as a meal on its own or
as a side dish to the various Nigerian Rice
Recipes.
How to Make Nigerian Salad [Video]
The quantities of ingredients stated are what will
give you a typical taste of the Nigerian Salad. The
quantities can be halved or multiplied and the
same taste will be achieved.
Ingredients
1 medium bunch of Lettuce
5 medium sized Carrots
4 small pcs of Irish Potatoes
2 medium pcs of Cucumber
3 medium Eggs
1 415g tin of Baked Beans in tomato sauce
200g of Sweet Corn
5 pcs of Plum Tomatoes (Jos Tomatoes)
Salad Dressing – the classic Heinz Salad Cream
works best with the Nigerian Salad recipe. A close
substitute is the Heinz Caesar Salad Cream. You
can use mayonnaise too.
Before you prepare the Nigerian Salad
Wash and cook the Irish Potatoes till done. The
eggs should be hard boiled. To save time, these
two can be cooked in the same pot as they need
almost equal amount of time to get done.
All the vegetables need to be washed.
1. Cut the lettuce into thin shreds.
2. Scrape and shred the carrots using a grater.
3. Peel and cut the boiled potatoes into sizeable
cubes.
4. Peel, remove the seeds and cut the cucumber as
shown. If you want more green color in your salad,
you may peel the cucumber in stripes.
5. Remove the seeds from the plum tomatoes and cut
into small pieces.
6. Place all the cut vegetables in separate containers.
Open the sweet corn and drain the preservation
water. Rinse the seeds and set aside. Also open
the baked beans tin and set aside.
Remove the shells of the hard boiled eggs, slice
thinly and set aside. An egg slicer is perfect for
this job.
Preparation
1. With the exception of the egg, start putting the
ingredients in small batches into a big salad bowl
till all are exhausted.
2. Now, place the sliced eggs on the salad, covering
the top.
3. Cover the bowl and place in the fridge for at least
one hour. This is to allow all the ingredients to mix
well.
4. Serve with a salad dressing of your choice but the
Heinz Salad Cream works best with this recipe,
seconded by a caeser salad dressing.
Notes and Tips
If you prefer your Nigerian Salad crunchy,
substitute the lettuce with cabbage. You can also
use the two as the lettuce adds a green color to
the salad.
The above are the minimum ingredients for making
a Nigerian salad. More ingredients such as boiled
macaroni, corned beef, green bell pepper, green
peas etc can be added for varied flavour.
The Nigerian Salad is best consumed within 24
hours of preparation if no salad dressing is added
to it.
If you are lucky to buy a baby cucumber, it may
not be necessary to remove the seeds.
Nigerian Salad can be eaten alone or as a side
dish to Jollof Rice , Coconut Rice , Fried Rice and
other Nigerian rice dishes .
Tuesday 13 May 2014
Nigerian Pepper Soup with Valerie Kadiri
The Nigerian Pepper soup is a popular Nigerian soup recipe. It is such a versatile recipe as it can be prepared with different types of meat and fish. Thus there is the Chicken Pepper Soup, the Catfish Pepper Soup (popularly known as Point & Kill), the Goat Meat Pepper Soup, the Cow Foot Pepper Soup and the Assorted Beef Pepper Soup.
People usually go to exclusive bars or restaurants to eat the Pepper Soup. This is because this Nigerian soup recipe is believed to be prepared with 'secret' ingredients that only the restaurant Madams know about. Yes, the Pepper Soup ingredient which gives this recipe its unique aroma and taste, is truly the best kept secret. But our job here at All Nigerian Food Recipes is to expose all Nigerian food recipes and cooking secrets so that you can prepare them right inside your own kitchen whenever you want to.
Ingredients for Pepper Soup Chicken | Cow Foot | Assorted Beef - 1 kg Ehu or Ariwo or Calabash Nutmeg - 4 seeds Chilli Pepper (to taste) Dry Uziza - 2 teaspoons (optional) Onions - 2 medium bulbs Salt - to taste Seasoning - 3 Maggi / Knorr cubes & 1 teaspoon of Thyme (for chicken pepper soup)
Before you cook the Nigerian Pepper SoupIf preparing Chicken pepper Soup, it is preferable to use whole chicken instead of drumsticks. The different parts of the chicken will bring variety to the pepper soup. So wash and cut up the whole chicken and set aside. If you want to prepare Assorted Beef Pepper Soup then you should buy different parts of beef - best cut, offal (shaki, round-about, liver and kidney). Wash the offal thoroughly especially the round-about which should be turned inside out during the washing. Cut these into medium pieces, just big enough to be chewed in one go. For Cow Foot Pepper Soup, just wash and cut the cow foot into medium pieces. In this case also, make the pieces just big enough that it can be chewed in one go. roast ehu for pepper soup Now it is time to prepare the 'secret' ingredient. Using an old frying pan, roast the Ehu seeds (stirring constantly) till you can smell it. Don't worry you will know when it is OK to take it off because it has a distinctive aroma. Another way to know that it is OK is to take one of the seeds and try to remove the outer membrane. If the membrane comes off easily, then the Ehu is done. grind ehu for pepper soup Peel off the membrane from all the Ehu seeds and grind with a dry mill. Cut the onions into tiny pieces. Rub the dry uziza with your fingers to break them into tiny pieces.
Cooking Directions
This cooking direction describes Chicken Pepper Soup. To prepare Goat Meat Pepper Soup, Cow Foot Pepper Soup or Assorted Beef Pepper Soup just substitute chicken with cow foot or beef and offal respectively. Place the pieces of chicken in a pot and pour enough water to cover the contents of the pot. Add the stock cubes, thyme and onions and cook till done. Note: When cooking Assorted Beef Pepper Soup, you should cook the shaki for sometime before adding the other beef parts. Shaki is tough and will take longer to cook than the other beef parts. Cow foot is a tough part of meat so when cooking Cow Foot Pepper Soup, you should use a pressure cooker if you have one. This will save you some gas or electricity. By now, you will notice that some of the water has dried. Add more water to bring it to the level of the contents of the pot. Add the ground Ehu, dry uziza, chilli pepper and salt to taste. Ehu has some spicy taste so you should add chilli pepper with care. Even though it is called pepper soup, you still want to be able to taste and enjoy the recipe itself. Too much chilli pepper will ruin it for you. Cover the pot and leave to boil for 5 minutes and the pepper soup is ready. Pepper Soup should always be served hot. It can be eaten alone with a chilled drink by the side. You can also eat it with Agidi, White Rice or Boiled Yam.
Spicy Goat Head
The process of preparing Isiewu is so similar to that of Nkwobi that lots of people find it hard to differenciate between the two of them. One major difference is that Nkwobi is prepared with cow foot while Isi ewu which literally means goat head, is prepared with goat head!
Ingredients for Isi Ewu1 Goat Head 15 cl (150ml) Red Palm Oil 2 teaspoons ground Ehu seeds (Calabash Nutmeg) 1 tablespoon powdered edible potash (Akanwu/Kaun/Keun) 2 big beef flavoured stock cubes 2 medium onions About 10 Utazi leaves (Gongronema latifolium) 2 habanero peppers (or to your taste) Salt (to taste) To garnish the Isi Ewu 1 onion About 10 Utazi leaves (Gongronema latifolium) Notes about the ingredients In Nigerian restaurants, the goat heads are cooked whole (without cutting them up) because they have a big pot where they can pile several goat heads and cook them at the same time. When preparing one goat head, it is not be practical to cook it whole because you will need lots of water to get the goat head well cooked. And since we do not want lots of water in the meat when done, it is better to cut the isi ewu up before cooking it. Goat meat is quite tough so if you have a pressure cooker, do use it for cooking it to save time and gas/electricity. Ehu (Calabash Nutmeg) is a very traditional ingredient that is difficult to find outide Nigeria. If you can't buy it where you live, just prepare the Isi ewu without it. Ordinary nutmeg is not an alternative to this because they are not similar in any way. If you have friends or family in Nigeria, they will be able to buy ehu seeds and send to you, a small quantity goes a long way. Potash is what makes the palm oil curdle as you will see in the video below. An alternative I know is what we call Ngu in Igbo. Ngu is even more traditional than potash so if you can't find potash, chances are that you won't be able to get Ngu either. Utazi adds a nice bitter flavour to the Isi ewu. if you can't buy it where you live, use spinach (bold ones), it gives the same effect and actually tastes nice! :))) Before you make the Isi Ewu Cut the goat head into pieces making sure that the essential parts: ears, tongue etc are whole cuts that is, they are not cut into pieces. Remove the brain and put in an aluminium foil bag then fold the bag to close just like with Nigerian Moi Moi. Wash the meat very well with foam and iron sponges where necessary, using a knife to scrape off the tough top skin especially on the tongue. There will also be traces of sooth from burning the fur off the goat, ensure that these are all cleaned. Put the powdered potash into a bowl. Add a small quantity of water (about 4 table spoons) and stir well. Pass it through a fine sieve and set the liquid aside. Cut the 2 onions into 4 big chunks. Crack and remove the outer shell of the ehu then grind with a dry mill eg coffee grinder. Pound the pepper with a mortar and set aside. Directions for making Isi Ewu Cook the goat head with the chunks of onion, the stock cubes and as little water as possible. Top up the water as necessary but make sure there is as little water as possible in the pot. This is because we do not want any stock in the pot when the meat is done. Remember to cook the brain too. While the meat is cooking, slice the onion for garnishing into thin rings. Cut half of the utazi into thin slices. Cut the other half into tiny pieces. The first will be used for garnishing while the latter will be added into the palm oil paste. When the meat is done, remove the chunks of onion, take out the brain and mash it up till smooth. Add salt, stir and cook till all the water has dried. Set the meat aside to cool down. Now, pour the palm oil into a clean dry pot. Pour in the potash mixture (sieved) into the oil. Stir with a wooden spatula as you pour the potash. You'll notice the palm oil begin to curdle and turn yellow. Keep stiring till all the oil has turned yellow. Use as little potash as possible because too much of it can upset your stomach. Add the pepper, mashed brain, ehu seeds and the utazi that has been cut to tiny pieces. Stir very well till they are all incorporated. Add the goat head to the palm oil paste and stir very well with a wooden spatula. Put it back on the stove/cooker and heat till the Isi Ewu is piping hot. Serve the Isi Ewu in a wooden mortar as shown in the image above. Garnish with the thin slices of utazi and onion rings for the full effects. Best served with chilled drinks: palm wine, beer or stout and soft drinks.
Valerie Kadiri: Spicy Barbecued Goat Meat

Ingredients for Asun
1.2kg (2.6 lbs) goat meat (cut with the skin) 2 habanero peppers (or to your taste) 1 medium onion 3 big stock cubes 1 teaspoon thyme Salt (to taste) 1 cooking spoon vegetable oil Black pepper (optional) To garnish 1 medium onion 1 small green bell pepper 1 small red bell pepper Before you make Asun
Cut the goat meat into big chunks. Make sure you cut the chunks with the goat skin. If the skin is not there, it won't be the real deal Asun. Wash and put the goat meat chunks in a bowl. Add the thyme and black pepper; crush and add the stock cubes. Feel free to add other spices and ingredients that you use to marinate meat. Mix the spices and the goat meat by gently rubbing with your hands. Cover the bowl with a thin film. Put in the fridge and leave to marinate for about 1 hour In my opinion, marinating beef and other kinds of meat is completely optional so you can skip the marinating process and go straight to cooking the goat meat. Pound or blitz the habanero (scotch bonnet) peppers and set aside. Cut 1 onion into 4 big chunks. Making the Asun After about 1 hour or the number of hours you chose to marinate the goat meat, put the meat in a pot. Use a pressure cooker if you have one because goat meat is quite tough and you will save lots of gas and electricity. Pour water to just half of the level of the goat meat, add the big chunks of onion and start cooking at medium heat. You do not want a lot of water because you want the water to dry up by the time the goat meat is well done. When the goat meat is well done, remove the big chunks of onions and add salt to taste. Increase the heat to high and stir constantly till all the remaining liquid in the pot is absorbed. You don't want to lose any flavour by pouring away the goat meat stock. Lay the goat meat flat on your oven rack. Grill/Broil in the oven at 180°C or 350°F till the meat is brown all over. You will need to turn them from time to time. The meat should not be dry. This takes a maximum of 15 minutes with my oven. While you are grilling the meat, wash, cut and thread the green bell pepper, red bell pepper and the remaining onion on toothpicks. When the meat it well grilled/broiled, heat the vegetable oil in a dry clean pot. Add the pepper and the thick stock from cooking the meat (if any) and fry for a bit. Add the grilled goat meat. Stir very well till the pepper is evenly distributed on the goat meat. The vegetable oil ensures that this happens and gives the Asun a nice glow. That's it! Serve with the threaded vegetables. If you are entertaining guests or having dinner with the family, serve with Fried Plantains or Jollof Rice. If you are hosting a party, place them in a flat tray and put out with other small chops and snacks for your guests to enjoy.
Monday 12 May 2014
Cowfoot Porridge
Cowfoot Porridge can also be Cowfoot & Yam Pepper Soup if you add enough water to it. I prefer mine a bit watery. Nigerian Cowfoot Porridge [Video] Prepare and serve this on a cold rainy day and you will be glad you did!
Prepare and serve this on a cold rainy day and you will be glad you did!
Ingredients for Cowfoot Porridge
720g (1.5 lbs) cow foot
12 medium cubes white puna yam
1 teaspoon ground Ehu (Calabash Nutmeg)
1 teaspoon black pepper
Habanero pepper (to your taste)
1 big onion
2 big stock cubes
Salt (to taste)
5 Scent leaves
Notes about the ingredients
720g of cow foot may sound like a lot but cow foot is mostly bones.
Cow foot is quite tough so if you have a pressure cooker, use it for cooking it to save time and gas/electricity. I cook mine for 15 minutes (counting from when the pot is pressurized).
Ehu (Calabash Nutmeg) is a very traditional ingredient that is difficult to find outide Nigeria. If you can't buy it where you live, skip it. Ordinary nutmeg is not an alternative to this because they are not similar in any way. If you have friends or family in Nigeria, they will be able to buy ehu seeds and send to you, a small quantity goes a long way.
Scent leaves give this meal a nice taste. Great alternatives are parsley and basil.
Before you make the Cowfoot Porridge
Cut the cow foot into medium chunks. Where I live, the butchers cut it for me.
Peel the yam and cut into medium cubes.
Pound/grind the habanero pepper.
Grind the ehu.
Cut the onion into 2 to 4 big chunks.
If using scent leaves or basil, use your finger tips to tear the leaves into medium pieces. No need to cut parsley.
Directions
Rinse and put the cow foot chunks in a pot.
Add enough water to cover the meat. If you want the porridge as thick as that of Yam Porridge, add less water.
Add chunks of onion. I use chunks of onion when I don't want pieces of onion in what I'm cooking.
Add the stock cubes (crushed), black pepper, ground ehu (calabash nutmeg) and habanero pepper.
Cover the pot and cook the cowfoot till done to your liking. If using a pressure pot, when done, depressurize under running water and set the pot back on the stove.
Add the yams and some salt. Cover and cook till the yams are well done. If using a pressure pot, there's no need to pressurize it this time.
When the yams are cooked to your liking, remove the big chunks of onion and add the vegetables.
Stir and it's ready to be served.
Serve piping hot with a chilled drink: palm wine, beer or stout and soft drinks.
Wednesday 23 April 2014
Plantain Mosa
Personal Food and Travel Blog of Valerie Kadiri
Profile of Valerie Kadiri
Nigerian Fried Beans
Personal Food and Travel Blog of Valerie Kadiri
Profile of Valerie Kadiri
Plantain Pies
Personal Food and Travel Blog of Valerie Kadiri
Profile of Valerie Kadiri
Nigerian Corned Beef Stew
Personal Food and Travel Blog of Valerie Kadiri
Profile of Valerie Kadiri
Tuesday 22 April 2014
Mini Sausage Rolls with Kadiri Valerie
Ingredients
For the dough
- 300g (10.5 oz) plain flour (all purpose flour)
- 1 teaspoon baking powder
- 120g (5.3 oz) margarine
- ½ teaspoon salt
- Cold Water
For the sausage filling:
- 500g sausage
- ½ teaspoon of ground nutmeg (optional)
- 1 small stock cube (optional)
For glazing:
Steamed Leafy Vegetables with Valerie Kadiri
Ingredients
- 300g or medium bunch green leafy vegetables. You can use any of the following:
- Green Amaranth
- Nigerian Pumpkin leaves (Ugu)
- Spinach
- 1 big onion
- 1 habanero pepper (atarodo)
- 1 small Knorr cube
Note
- You do not need salt for this recipe. The steamed veggies garnish is well seasoned by the Knorr cube.
Cooking Directions
- Wash and slice the vegetables, onion and pepper.
- Set a clean dry pot on the stove and set the heat to medium.
- Add the sliced onion and pepper.
- Crush and spread the Knorr cube on the onion and pepper.
- Add the sliced vegetables.
- Cover the pot and steam for 3 minutes. This is so that the vegetables are not overcooked.
- Stir very well and it is done.
It is generally eaten as a side dish to such foods as Jollof Rice, Fried/Barbecued Chicken, Moi Moi and many other rice dishes.
Coleslaw is usually served chilled to allow the dressing settle into the vegetables.
Ingredients
- 1 small cabbage
- 1 small green bell pepper
- ½ tin of green peas
- 2 medium carrots
- 1 medium onion
- 5 tablespoons of salad cream (preferably Heinz Classic Salad Cream)
- 4 tablespoons of mayonnaise
- ½ teaspoon sugar
- A pinch of salt
Preparation
All the vegetables need to be washed.- Cut the cabbage, green bell pepper and onions into very tiny pieces.
- Scrape and shred the carrots using a grater, then use a knife to cut across the shreds to make the pieces even smaller.
- Put the cabbage, green pepper, green peas, onions and carrots into a large bowl and stir till you get a good mix.
- In a separate, smaller bowl, mix the salad cream, mayonnaise, sugar and salt.
- Pour the cream mix into the bowl of vegetables and stir very well.
- Chill and serve.
Note: If you prefer the coleslaw creamier, you can increase the quantity of the salad cream. Feel free to add a pinch of ground pepper if you like it spicy.Coleslaw can be eaten alone or as a side dish to Jollof Rice, Coconut Rice, Fried Rice and other Nigerian rice dishes.
- See more at: http://www.allnigerianrecipes.com/salad/coleslaw.html#sthash.ZwKn0U7l.dpufzzzzzzzzzzzzzzzzzzzzzzzzzzzzzzzzzzzzzzzzzzzzzzzzzzzzzzzzzzzzzzzzzzzzzzzzzzzzzz
Sunday 20 April 2014
How to Make Pounded Yam
<br>
Pounded Yam is the most stretchy of all the Nigerian fufu recipes that is if it is well prepared. It has the softness of semolina fufu hence it is not as hard as cassava fufu. Pounded Yam can be prepared by stirring yam flour in hot water but those who have eaten the one made from scratch with raw yams will tell you that the yam powder method does not do the pounded yam good justice.
<br>
To prepare pounded yam from scratch, you simply cook white yam and pound the yam pieces with a mortar and pestle when done. Sounds easy, doesn't it? Not really. There are a few tricks to making the perfect stretchy Pounded Yam from raw yams and it is better to see these than try to understand the written explanation. Watch the video below to learn how to make the perfect stretchy pounded yam so that your days of making mashed potatoes in the name of pounded yam will stop right here.
My Blog
http://nairaland.com/valeriekadiri
Saturday 19 April 2014
How to cook Boiled Plantain with Valerie Kadiri
Ingredients Ripe / Unripe Plantain – as many pieces as you can eat! Palm Oil Onions Hot Chilli Pepper Salt (Optional) Cooking Directions Wash the plantain and cut each fruit into two or three pieces depending on how big the fruits are. Put in a pot, add some water and set to cook. Meanwhile chop the onions and chilli pepper. Heat some oil (just enough heat to melt it). Pour in a plate and add the chopped onions and chilli pepper. Add salt to taste. Cook the plantain till done, add some salt to your taste and allow to simmer for a few more minutes. If using ripe plantains, be sure to watch the cooking closely because it will get done quicker than unripe plantains. The boiled plantain is ready to be served. Remember to remove the peels before eating! My NairaLand Account My Travel Blog My Yatedo Account
Plantain Moi Moi with Valerie Kadiri
The proof of Plantain Moi Moi is truly in the eating! lol Ingredients 2 pcs of overripe plantain (Even if the skin is now black, as long as the inside is not decomposed) 100g plantain flour 1-2 cooking spoons palm oil 1 teaspoon ground crayfish 1 onion Pepper and Salt (to taste) 1 Knorr cube Cool water
Containers Uma leaves (Thaumatococcus Daniellii) Aluminium foil bags Bowls Before you cook Plantain Moi Moi Prepare the uma leaves for the Plantain Moi Moi using the method detailed at: How to prepare uma leaves for Moi Moi. Put the plantain flour in a bowl, add a small quantity of water and mix till you get a medium consistency. Wash, peel and cut the overripe plantain into small pieces. Grind the crayfish, cut the onions and pepper into small pieces. Cooking Directions Blend the overripe plantain pieces, plantain flour batter, onions, crayfish, pepper and stock cube with just enough water to allow the blades of the blender move. Pour the smooth blend into a sizeable bowl. Add salt and palm oil. Mix thoroughly till well combined. Set a small quantity of water in a pot to boil. When the water boils, place a base for the Plantain Moi Moi wraps into the pot. This can be scrap pieces of aluminium foil, a stainless steel stand or leaf stalks from the uma leaves. Scoop the mix into folded uma leaves, just as you would with beans Moi Moi. Gently place the wraps in the pot of boiling water and cook for 20-25 minutes. Add water along the way if necessary. Leave to cool down completely and set before serving. Serve with Custard, oat meal or akamu (corn starch meal). It can also be eaten with a chilled drink as a quick snack. My NairaLand Account My Travel Blog My Yatedo Account
Plantain Puffs with Valerie Kadiri
See another version of Plantain Mosa (Plan-cakes) Plantain Mosa Ingredients The following ingredients give 16 medium balls of Plantain Mosa: 1 over-ripe plantain 3 heaped tablespoons plain flour (all purpose flour) 2 teaspoons fast action yeast 8 tablespoons warm water Habanero pepper (to taste) Salt (to taste) Vegetable oil (for frying)
More information about the ingredients The vegetable oil should be about 3 inches deep when poured into the pot. You can use cayenne pepper (fresh or dry) in the absence of Habanero pepper. The dry one needs to be ground into powder before use. Directions Mix the fast action yeast with the warm water making sure there are no lumps. Cover and set aside. Peel the overripe plantain and mash with a fork till a good blend is achieved. Set aside. Sift the plain flour and the salt into a sizeable bowl. Mix thoroughly. Add the yeast solution and stir till you get a medium consistency. If it is too thick, add a few more tablespoons of warm water and mix till you get a medium consistency. Add the mashed plantain. Mix with a spatula till well incorporated. Cover with aluminium foil. Leave in a warm place to rest for 10-15 minutes. After that time, you'll notice that it a bit fluffy. Beat the batter with a spoon then add the habanero pepper (cut into pieces). You can also use cayenne pepper. Heat some vegetable oil in a pot. The oil should be about 3 inches deep. The oil is hot enough when a small quantity of batter dropped into the oil sizzles and quickly comes to the surface of the oil. Scoop small amounts of the batter into the oil using your finger tips. Watch as they sizzle, come up to the suface of the oil and puff up. Stir constantly till golden. Reduce the heat if you think the plantain mosas are browning too quickly. This is to ensure that the inside is well cooked by the time the outside browns. When done, transfer to a paper-lined sieve to drain. That's it! Serve with a chilled drink.
My NairaLand Account My Travel Blog My Yatedo Account
Friday 18 April 2014
Vegetable Sauce Recipe
This tasty recipe, made from chopped salad vegetables<br> is a colourful way to enjoy a
wide range of staple foods with vegetables. Some people even call it Salad Stew. Eat
it with white rice, boiled yam , fried plantain or even mashed potatoes.
It is very rich in vitamins and nutrients. So there is no reason why you should not be
cooking this recipe as soon as possible.
I promise you'll not want to eat the Nigerian Red Stew ever again after eating this
vegetable sauce.
Ingredients
Whole Chicken
Vegetable Oil (2 cooking spoons)
5 Spring Onions
8 Fresh Plum Tomatoes (Jos Tomatoes)
8 medium Carrots
Cabbage (1 small bulb)
Potatoes (3 medium sized)
1 Red Bell Pepper (optional)
1 Green Bell Pepper
Salt - to taste
Seasoning – 3 big stock cubes, thyme
Before you cook the Vegetable Sauce
1. Wash and cut the vegetables : plum tomatoes (remember to remove the seeds),
carrots, cabbage and bell pepper as shown. Remember to scrape the carrots before
cutting. Set these aside.
2. Peel the Irish potatoes, wash and cut into small pieces. Blend into a thick paste and
set aside. This will be used as thickener for the Vegetable Sauce.
Cooking Directions
1. Wash and cut the whole chicken into pieces. Place in a pot, add chopped spring
onions, stock cubes and thyme. Add water to cover the contents of the pot and start
cooking.
2. When done, add salt to taste and top up the water to the same level as the contents
if necessary.
3. Once it boils, add the chopped tomatoes and the vegetable oil. Cover and cook for 15
minutes.
4. Add the carrots and cook for 5 minutes.
5. Now, add the potato puree, chopped bell peppers and cabbage. Stir, cover and allow
to cook for 5 minutes on high heat. Add salt to taste and the sauce is ready to be
served.
Note: Feel free to experiment by varying the thickness of the vegetable sauce. This
you can achieve by increasing or decreasing the amount of potato puree added till
you get a consistency that appeals to you.
Tip: The smoothest puree usually settles at the bottom so you may want to use only
that (if it is sufficient) and discard the frothy part at the top.
Serve with white rice, boiled yam , fried plantain or mashed potatoes.
www.nairaland.com/ valeriekadiri
Tuesday 15 April 2014
Roasted Yam
Other popular Nigerian street foods include: Nigerian Suya and Nigerian Roasted Plantains (Boli)
Ingredients
700g White Yam 1 medium onion A handful Ukpaka (Sliced oil bean seeds) 10cl palm oil 1 habanero pepper or to taste Salt (to taste)

Peel and cut the yams into 1 inch thick pieces. Wash and soak the yam pieces in salted water overnight. Put it in the fridge so they do not ferment. This soaking helps keep the inside of the yam moist during roasting. If you want to roast the yams in the evening, you can soak them in the morning. Just before you roast the yams, cut the onions into tiny pieces. Roasting Directions
Pour out the water used in soaking the yam pieces. Add some salt and toss to distribute evenly. Place the yam pieces flat on the oven rack, set the oven to grill (broil) and roast at 150°C (300F) till the top side of the yams are light brown. Turn the yam pieces to roast the underside too till they are light brown all over. When the yams are almost done, you can increase the temperature to 180°C (350F) so that the outside of the yam pieces will be very crunchy.
There are many ways to go about it. You can roast one side for 10 minutes, turn and roast the other side for 10 minutes etc. I roasted mine for a total of 30 minutes, increasing the temperature when the yams are almost done. Your own time may vary depending on the type and heating capacity of your oven. They are done when the inside of the yams are moist and well done and the outside is light brown and crunchy. Make the Pepper Sauce While the yams are roasting in the oven, pound the pepper, diced onions and ukpaka in a mortar till a smooth blend is achieved. You can also use any food processor that will allow you blend ingredients without adding water. When smooth, transfer to a bowl and add salt and palm oil. Stir well and the pepper sauce is ready. Your roasted yam is ready! To eat, dip the pieces of roasted yam in the pepper sauce and chew. Wash it down with a cold drink.
My NairaLand Account
My Blog
My Tumblr Account
My Twitter Account
Nigerian Yam & Vegetable with Ukpaka (Ugba)
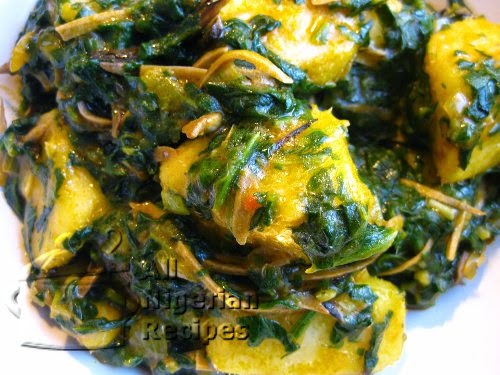
Ingredients
Yam 1kg Leafy Vegetable - Spinach/Fluted pumpkin/Green Amaranth/Water Leaves Red palm Oil – to colour Okra – 4 fingers (optional) Ukpaka or Ugba: a handful (optional) Onions – 2 medium bulbs Chilli Pepper & Salt – to taste Seasoning: – 2 cubes of Maggi / Knorr
Before you cook Yam & Vegetable
Peel and cut the yam tuber into 2 inch cubes. Wash the yam cubes and place in a sizeable pot. Wash and cut the leafy vegetables, I used frozen spinach. Just leave to defrost a little bit and cut into small pieces. Then when fully defrosted, wring out the excess water. rinse the ukpaka and cut the onions and okra into tiny pieces. Grind / Blend the chilli pepper. Put all these in a separate pot and set aside. The okra only helps the vegetables stick together so it is optional and with the ukpaka, you can go the extra mile with this recipe :) Cooking Directions
Pour enough water to cover the yam cubes and cook till the cubes are soft and the water is a bit like porridge. Now, pour out the water from the pot, leaving the yam cubes in the pot. Cover the pot to retain the heat. Add some water from the yam (about 1 cooking spoon) to the pot containing the vegetables. Cook till the vegetable is softened by the heat. Be careful not to overcook the vegetable. Pour the cooked vegetables and other ingredients into the pot containing the yam cubes. Add the palm oil and salt to taste. Stir with a wooden spoon till all the ingredients have mixed well. The yam and vegetable is ready to be served. Serve on its own or with Fried Plantain
My NairaLand Account
My Blog
My Tumblr Account
My Twitter Account
Friday 11 April 2014
Cook better with Valerie Kadiri
Valerie Kadiri teaches you how to become a better cook. In this series.
Everyone wants to become better in any skill they
have. Cooking is no exception. Even if you think you
are hopeless in the kitchen; like everything else,
practice and increasing your knowledge makes perfect. Just
relax and pretend that you are playing with the ingredients
and you will realize that cooking is not such a daunting
task. The following are All Nigerian Food Recipes' top 10
tips to becoming a better cook.
1. Add to what you know
Constantly increasing your knowledge of cooking is important because you already
know the basics of cooking and you are interested in improving your skills. Search
for recipes on the web and in cookery books, read them through even if it is a recipe
for a meal you think you have perfected. With Nigerian food recipes, and any other
world recipe, there are often many ways to cook a meal and achieve the same
results. So there's always something new to learn.
When you eat a familiar meal and you notice an improvement in the taste, it is good
to ask the cook what he/she did to achieve that.
How to Season and Grill Chicken with Valerie Kadiri
You want to season your chicken so that it will be very tasty and you also want to prepare it such that it will be presentable and appetizing. Seasoning chicken is very easy and you only need a few ingredients. Most often, people think that you have to add all the spices and stock cubes in the world to make the chicken tasty. But what all these excess seasoning does to the chicken is to take away the natural flavour of the chicken. To season chicken, you only need these major spices and
ingredients: Chicken - Hen (female chicken) is tougher and tastier than cockerel (male chicken) so when you go to buy chicken, ask your grocer or meat seller for the hen. This is called Gallina in Spanish. You should also buy a whole chicken and cut it up in pieces. Not only is it cheaper but you get the different parts of the chicken which adds to the flavour rather than just one part.
Onions - White, yellow or red onions. Onions are very important when seasoning chicken. Thyme - This is very essential due to the aroma it adds to the chicken. Stock cubes - Maggi or Knorr are the brands that bring out the best taste in Nigerian recipes. Salt - Use salt sparingly when seasoning your chicken. Salt should be added when the chicken is done. Never add salt to raw chicken, see notes below for more information on what adding salt too early does to your chicken or beef. You should also grill your chicken after cooking it rather than deep-fry it. If you have an oven, please grill your chicken because it is healthier. Grilling also makes the chicken taste better.
My Link
My Tumblr Link
NairaLand Link
My Blog
Wednesday 9 April 2014
Basmati Jollof with Valerie Kadiri
Tuesday 8 April 2014
How to make Semolina with Valerie Kadiri
S
Home >> Fufu Recipes >> Semolina Fufu Recipe
How to Make Semolina Fufu
emolina is produced by milling semolina grains into powder. In Nigeria,
Semolina flour is used to prepare the Semolina fufu which is eaten with the
various Nigerian soup recipes . The Semolina fufu recipe is simply prepared by
mixing the semolina flour in hot wate
Cut leafy vegetables faster with Valerie Kadiri
I always say that cooking should be fun not hard labour. Here’s one of the ways to
save some time in the kitchen.
We are taught to arrange leafy vegetables before slicing them. I call that the prim and
proper way where one spends lots of time arranging the vegetables. I don’t even
want to think about arranging and cutting those vegetables on a day I will cook
Nigerian Vegetable Soup (Edikang Ikong).
With the method detailed below, you are done in no time.
Please note that when you want to slice the vegetables for use as garnish for Nkwobi,
Isi Ewu or Abacha, you will need to arrange the vegetables. The good thing is that in
those instances, it’s not too much work because we usually need a small quantity of
vegetables for garnish.
Here’s how to do it:
1. Pick the vegetables from the stalk.
2. Wash them in plenty of cool water. Add salt to the water if you wish.
3. Place the vegetables in a sieve to drain.
4. To slice, deep your finger tips into the vegetables in the sieve and grab as many
leaves as you can comfortably hold in your hand.
5. Place the leaves on a chopping board and cut them in half with a sharp knife.
6. While holding one half of the vegetables in one hand, use your other hand to tuck the
other half under the one you are holding.
7. Using the perfect straight edge of vegetables as reference, slice the rest of the
vegetables normally.
valeriekadiri.blog.com
https://twitter.com/ ValerieKadiri
Monday 31 March 2014
African salad with Valerie Kadiri
Abacha – as the Igbos love to call it - is one of the most popular evening desserts in the eastern villages, it serves best as kola to visitors, as a matter of fact, there are villages in the eastern part of Nigeria that only offer ugba or abacha to visitors and even visitors have come to love and desire the delicious delicacy.
The fresh Abacha (African salad is a by-product of cassava), there are a lot of processes involved with obtaining the fresh abacha that is used in preparing the African salad that we all know . Most rural dwellers are very familiar with the whole process involved.
The first thing to do (if you live in the village or own a farm) is to obtain cassava tubers, wash thoroughly and boil along with water for twenty to thirty minutes then pill to remove the brown outer layer, and cut to tiny bits.
The sliced cassava is then soaked in water for 18 hours or more. The last thing to do would be to wash thoroughly with clean water then sun-dry and store in an airtight seal. Dried cassava chips can last more than a year if stored in an air tight dry environment.
But if you live in developed cities you probably wouldn’t need to go through this cumbersome and tiresome procedure, just buy every one of the ingredients in the market
Here are all the ingredients that are needed for preparing Abacha (African salad) whether you are within or outside Nigeria. Some of them are extremely required while few of them are optional
Ingredients for African Salads
6 to 8 cups of Abacha (African Salad) {image below} Ehu 3 seeds (optional) 1 to 2 cups Of Ugba (Ukpaka) half cup of crayfish 1 to 2 cubes of maggi or knorr About 10cl of palm oil Edible powdered potash(1 teaspoon) salt and pepper to taste. 3 to 5 garden eggs (optional) Utazi leaves (optional) Garden egg leaves (optional) (image in the tray below) Meat/dry fish or stock fish.(optional) I told you that most Nigerian foods are served with either fish or meat, Even the African Salad (Abacha) is also served with either fish, meat or even stock fish (okporoko), although there is none of that in the image below. Here is how to prepare African salad.
African Salads in Nigeria with Valerie Kadiri
I like using the dried abacha (as you would find in the plate above) instead of the freshly made wet abacha the only reason is because the former give you the advantage of heating at the beginning for few minutes without being overly wet.You can either heat or soak the dry Abacha in boiled water for about three minutes, then sieve and keep on a separate bowl.
Blend your crayfish and also slice the onions, garden egg leaves. It is advisable to dissolve the powdered potash in about 5 cl of clean water; this is a trick I employ just to easily filter out unwanted solid materials that is often embedded in potash.
Filter the dissolved potash into a mortar or pot leaving out the residue.
Add about 10cl of palm oil and stir to form a yellowish paste (ncha, as addressed by the igbos), This is the first part to making Abacha (African Salad), add the ground crayfish and pepper, stir, then add the ground ehu if you like.
Ugba is an important ingredient in the process of making African salad, it is considered incomplete without the present of this ingredient. Ugba is usually sold in most Nigerian markets or African shops (if you live outside Nigeria). Add the ugba to the mixture and stir, and then add the abacha, salt. It is advisable to heat the abacha (using the method outlined above) just few second before you use so it doesn’t get cold, as most people in Nigeria like their Abacha to be a little bit warm. Stir the whole combination and you are almost through with the preparation part.
The garden eggs, the leaves and the onions are used mostly to spice up or for decoration purposes and not added during preparation but while dishing out. They are often sliced and kept aside in different plates or bowls, then added while individual plates are dished out; this also goes for the meat or fish used.
Taste the combination in the mortar or pot, if it is as tasty as you desire, you may also want to turn on the cooker and heat for few minutes if it is not as warm as you desire.
Serve with the meat and also add the garden eggs (sliced) and leaves to individual plate, most people in the rural centers like to take African salad with palm wine. So get a bottle of palm wine or your favorite soft drink
Visit me on Twitter
My Travel Story Blog
My LinkedIn Page
Nigerian Nkwobi Recipes with Valerie Kadiri
This evening dessert has been around for a very long time, initially it was made with just bush meat (edible wild animals), the like of squirrels, grass cutter, rabbit and even antelopes could be used to make this delicious evening dessert but along the line people starting experimenting with domestic animals and even poultry birds. If you are among the folk that are asking “what is nkwobi?” here is a simple definition; It is Igbo delicacy that is made with different kinds of meats, in a little while you will read all the processes involved in making it and why it is very popular within the eastern part of Nigeria. You will also learn about all the ingredients used in making it and different kinds of meats that could also be used. I remember vividly the first time I had a plate of Nigerian nkwobi, it was very delicious and very pepperish. Although you can use pepper to your taste. The last recipe I ate was made with chicken, but like I said initially, your choice of meat can vary but the methods remain the same.
Here are the ingredients that are used in making Nigerian nkwobi (for five to ten persons.) 2 kg Meat (chicken, wild meat, goat, cow tail, assorted meat) 1 cube of knorr Utazi leaves Edible potash (one teaspoon) Palm oil Ugba Onions Salt and pepper to taste The first step is parboiling the meat with some ingredients; onions, a cube of maggi/knorr and salt will be enough. Then allow to cook for another fifty to sixty minutes until the meat is completely soft for consumption.
This is necessary because nkwobi as well as Nigerian pepper soup is basically made with very soft meats, just so it is not hard to chew. Most preparation processes take place in a small mortar, (an African carved hollow wood), but you can use a pot if you are not in Nigeria. This is just how it has been, some of Nigerian food customs have been around for years and we probably haven’t found a credible reason why they should be revoked. Slice the onions and utazi, then set aside on a plate, some people choose to add these two during the preparation process while others use them for decoration purposes. One way or another, Utazi and onions should be part of the ingredients used in preparing Nigerian Nkwobi.
Nigerian Nkwobi with Valerie Kadiri
You can boil the ugba in small amount of water for about 2 to 3 minutes, this technique is hygienic, it helps to eliminate every possible health threat. Note that this ingredient is processed with the help of an harmless bacteria. This is just to be on the safe side even though most Nigerians eat ugba without heating in any way.
Cook the meat until it is almost dry of water, check to see the level of water. This is necessary so you don’t end up with another kind of pepper soup, Stir the cooking meat in the pot to be sure that it doesn’t burn. Did I say that it is also necessary to cut the meat to tiny bits? Dissolve the potash in about 15cl of water and filter into the pot, if you have seen the video on making African salads, you will know exactly how this is done, although most Nigerians are familiar with this technique.
Add about 10 to 15cl of palm oil into the pot, stir to obtain a thick yellow paste (ncha) and you are just few steps away from having a very delicious nkwobi, also add the meat and the ugba, then stir very well. Add the sliced onions and utazi but reserve a little of both for decoration. The utazi is very necessary because it adds a faint bitter taste which is an integral part of nkwobi and some other Nigerian desserts.
Visit me on Twitter
My Travel Story Blog
My LinkedIn Page